【MYC-LR3576开发板】基于人脸识别的门禁系统
本文介绍了米尔 MYC-LR3576 开发板结合 OpenCV 人脸识别和 PWM 舵机控制实现智能门禁系统的项目设计,包括硬件连接、舵机控制、人脸识别、网页前端设计、网页服务器设计、流程图、代码和效果演示等流程。
项目介绍
- 准备工作:硬件连接、开发板介绍、系统登录等;
- 环境部署:OpenCV 安装、Ultralytics 部署等;
- 工程测试:人脸检测、物体识别、人脸识别及其代码、效果演示等;
- 舵机控制:PWM输出、转速和角度控制、代码、效果等;
- 门禁系统:文件目录、流程图、代码、效果等。
准备工作
包括硬件连接、MYC-LR3576介绍、资源特点、参数性能、系统登录、网络连接、SSH访问等。
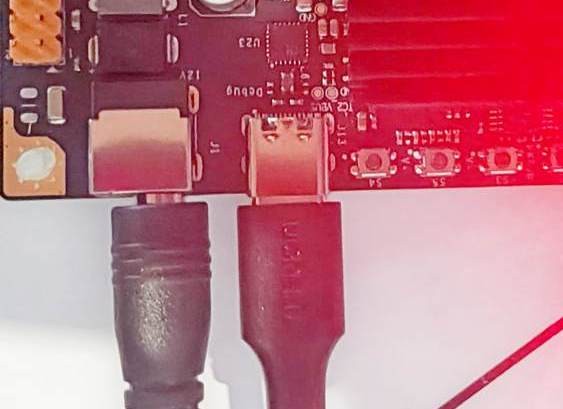
硬件连接
- 连接 WiFi 实现无线网络通信;
- 使用配套的 DC 电源实现设备供电;
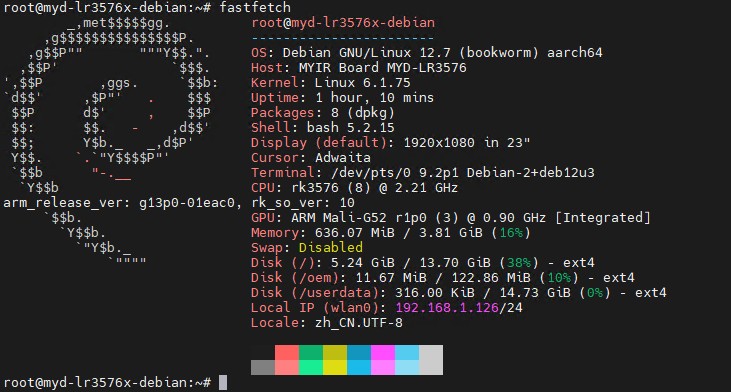
MYC-LR3576

- 瑞芯微RK3576处理器,8核6T高算力赋能工业AI智能化
- AI边缘应用:搭载6 TOPS的NPU加速器,3D GPU;
- 多种外设:双千兆以太网、PCIE2.1、USB3.2、SATA3、DSMC/Flexbus、CANFD、UART等;
- 8K@30fps/4K@120fps 解码(H.265、VP9、AVS2、AV1),4K@60fps编码(H.265、H.264);
- 多种多媒体接口HDMI/eDP/DP/MIPI-DSI/Parallel RGB/MIPI CSI/16M Pixel ISP;
- LGA381 PIN、商业级:0℃ ~ +70℃、工业级:-40℃~+85℃;
- 适用于工业、AIoT、边缘计算、智能移动终端以及其他多种数字多媒体等场景。
资源参数
| 名称 | 配置 |
|---|
| 处理器型号 | RK3576:4xARM Cortex-A72@2.2GHz + 4xARM Cortex-A53@1.8GHz, Cortex-M0,6 TOPS NPU |
| 4xARM Cortex-A72 @1.6GHz + 4xARM Cortex-A53 @1.4GHz |
| 内存 | 4GB LPDDR4X / 8GB LPDDR4X |
| 存储器 | 32GB eMMC / 64GB eMMC |
| 其他存储 | E2PROM 32KBit |
| 接口类型 | LGA 381 PIN |
| 工作温度 | 0℃ ~ +70℃ |
| 机械尺寸 | 43x45x3.85mm |
| 操作系统 | Linux、Debian12、ubuntu22、Yocto、Android14 |
默认出厂系统为 Debian12 。
详见:米尔开发者中心 .
系统登录
可使用 UART 串口登录和调试系统、或使用 SSH 远程网络登录。
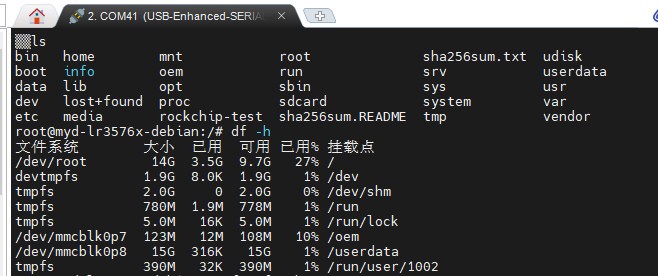
串口登录
- 使用 Type-C 数据线连接板载 UART 调试接口;
- 使用 MobaXterm 软件,新建串口连接,波特率 115200 bps;
SSH登录
包括网络连接、获取 ip 地址、SSH 远程登录。
网络连接
可采用有线或无线连接方式将设备联网。
nmcli device wifi list
nmcli device wifi connect "<SSID>" password "<Password>"
nmcli connection show --active

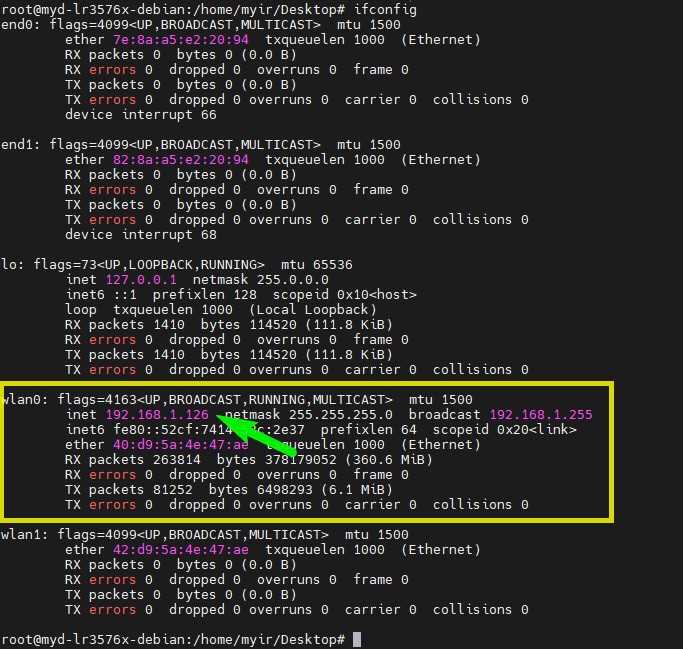
IP 地址
终端执行 ifconfig 指令,获取 WLAN0 对应的 ip 地址,如 192.168.1.126 ;
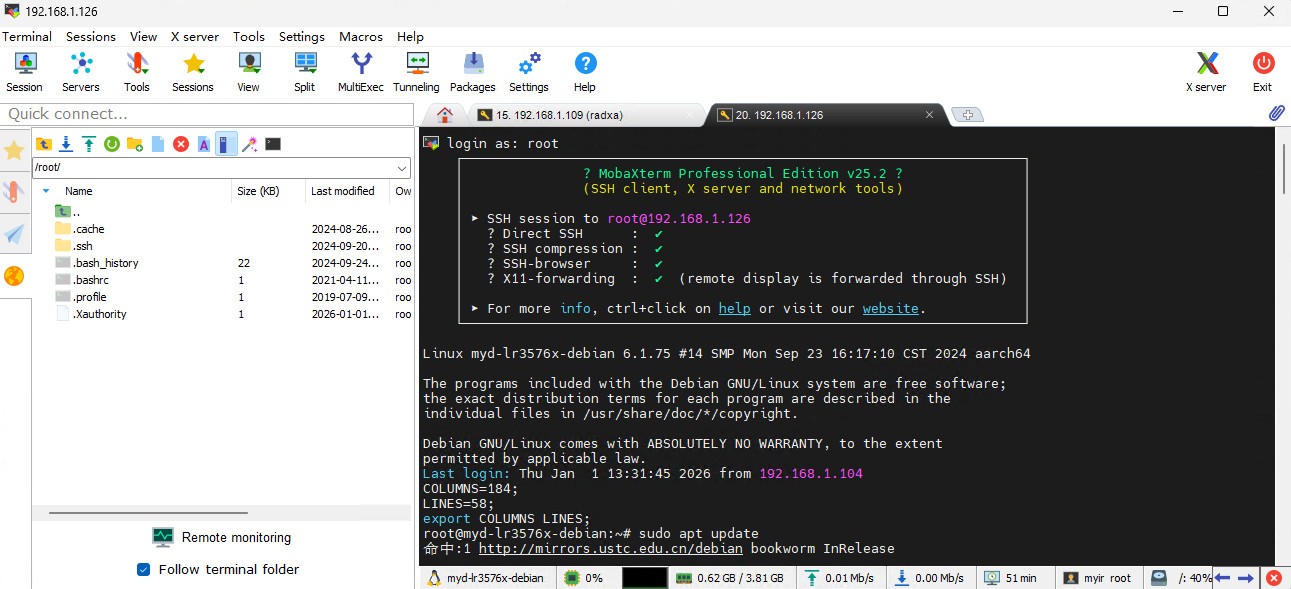
远程登录
使用 MobaXterm 软件 SSH 登录板端系统;
环境部署
安装 OpenCV 和 Ultralytics 开发环境,便于人脸识别项目部署。
OpenCV
OpenCV 是一个开源的计算机视觉库,广泛应用于图像处理、视频分析和机器学习等领域。
终端执行指令
sudo pip3 install opencv-python opencv-contrib-python --break-system-packages
详见:OpenCV .
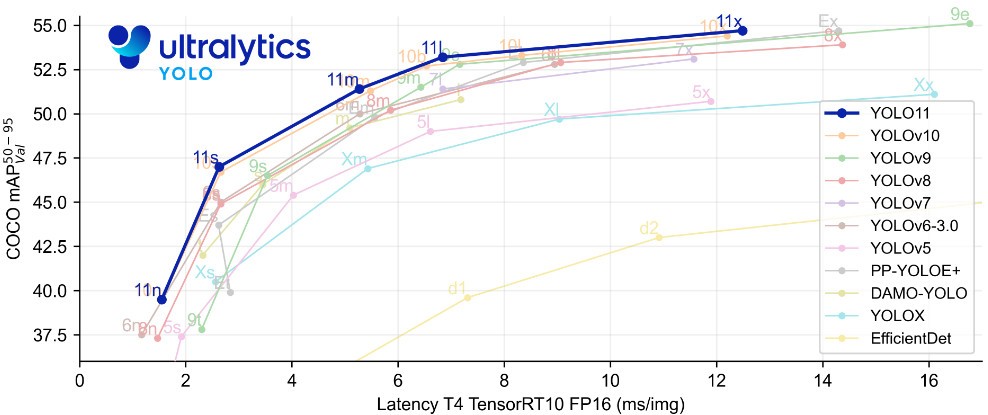
Ultralytics 部署
Ultralytics 基于多年在计算机视觉和人工智能领域的基础研究,打造出尖端、先进的YOLO 模型; 具有 速度快、精度高、操作简便 等特点;在目标检测、跟踪、实例分割、图像分类和姿态估计等任务中表现出色。
- 使用系统或第三方轮子,安装 ultralytics 软件包
sudo pip3 install ultralytics --break-system-packages
python3 -c "import ultralytics, sys, torch; print('✅ ultralytics', ultralytics.__version__, '| torch', torch.__version__, '| Python', sys.version.split()[0])"

详见:ultralytics .
工程测试
包括人脸检测、物体识别、人脸识别、舵机驱动等。
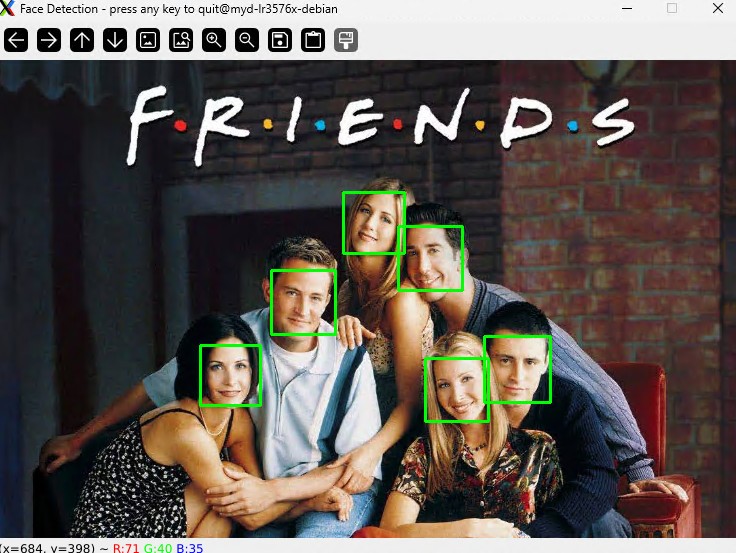
人脸检测
终端执行指令 touch fd_xml.py 新建程序文件并添加如下代码
#!/usr/bin/env python3
import cv2, argparse

parser = argparse.ArgumentParser()
parser.add_argument('-i', '--image', default='./img/friends.jpg')
args = parser.parse_args()
IMG_FILE = args.image

img = cv2.imread(IMG_FILE)

cascade_path = cv2.data.haarcascades + 'haarcascade_frontalface_default.xml'
face_cascade = cv2.CascadeClassifier(cascade_path)

gray = cv2.cvtColor(img, cv2.COLOR_BGR2GRAY)
faces = face_cascade.detectMultiScale(
    gray,
    scaleFactor=1.1,
    minNeighbors=5,
    minSize=(30, 30)
)

for (x, y, w, h) in faces:
    cv2.rectangle(img, (x, y), (x+w, y+h), (0, 255, 0), 2)

cv2.imshow('Face Detection - press any key to quit', img)
cv2.waitKey(0)
cv2.destroyAllWindows()
终端执行指令 python3 fd_xml.py -i ./img/friends.jpg ,弹窗显示结果
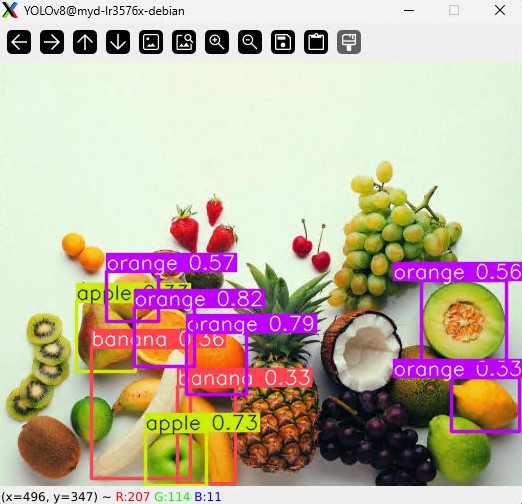
物体识别
终端执行指令 touch or_yolo8.py 新建程序文件并添加如下代码
#!/usr/bin/env python3
import cv2, argparse
from ultralytics import YOLO

parser = argparse.ArgumentParser()
parser.add_argument('-i', '--image', default='./img/desktop.jpg')
args = parser.parse_args()
IMG_FILE = args.image

img = cv2.imread(IMG_FILE)
cv2.imshow('YOLOv8', YOLO('./model/yolov8n.pt')(img)[0].plot())
cv2.waitKey(0)
终端执行指令 python3 or_yolo8.py -i ./img/fruits.jpg ,弹窗显示结果
人脸识别
OpenCV 作为计算机视觉领域的核心库,其 Python 接口提供了高效的人脸检测与识别能力。
OpenCV 注册并训练目标人脸,使用 YuNet 模型检测人脸,结合 sface 模型识别人脸。
详见:opencv_zoo/models/face_recognition_sface · GitHub .
模型
下载所需模型文件,包括人脸检测和人脸识别 ONNX 模型文件;
wget https://github.com/opencv/opencv_zoo/blob/main/models/face_detection_yunet/face_detection_yunet_2023mar.onnx
wget https://github.com/opencv/opencv_zoo/blob/main/models/face_recognition_sface/face_recognition_sface_2021dec.onnx
将文件存放在 ./model 路径。
训练图片
- 将目标人脸图片裁剪至合适大小;
- 文件名为对应的人名;
- 置于
./face 文件夹。
<img src="fig/fr_faces.jpg" style="zoom:80%;" />
文件目录
~/face_recognition/$tree
.
|-- face
|   |-- Cox.jpg
|   |-- David.jpg
|   |-- Jennifer.jpg
|   |-- Lisa.jpg
|   |-- Matt.jpg
|   `-- Perry.jpg
|-- fr_onnx.py
|-- img
|   |-- friends.jpg
|   `-- friends2.jpg
`-- model
    |-- face_detection_yunet_2023mar.onnx
    `-- face_recognition_sface_2021dec.onnx
将目标识别图片置于 ./img 文件夹。
代码
终端执行 touch fr_onnx.py 新建程序文件,并添加如下代码
#!/usr/bin/env python3
import cv2
import argparse
import os
import numpy as np
from pathlib import Path

# ------------------- Face Detection ------------------
def detect_faces_yunet(image_path: str,
                       conf_threshold: float = 0.8,
                       model_path: str = "./model/face_detection_yunet_2023mar.onnx") -> None:
    img = cv2.imread(image_path)
    if img is None:
        raise FileNotFoundError(image_path)
    h, w = img.shape[:2]

    # 初始化 YuNet
    detector = cv2.FaceDetectorYN_create(
        model=model_path,
        config="",
        input_size=(w, h),
        score_threshold=conf_threshold,
        nms_threshold=0.4,
        top_k=5000
    )
    detector.setInputSize((w, h))

    # detect 返回 (status, faces)  取第 1 个元素
    faces = detector.detect(img)[1]
    if faces is None:
        faces = []

    for face in faces:
        x, y, w_box, h_box, *_ = map(int, face[:4])
        score = face[-1]
        cv2.rectangle(img, (x, y), (x + w_box, y + h_box), (0, 255, 0), 2)
        label = f"{score:.2f}"
        label_size, _ = cv2.getTextSize(label, cv2.FONT_HERSHEY_SIMPLEX, 0.5, 1)
        cv2.rectangle(img, (x, y - label_size[1] - 4),
                      (x + label_size[0], y), (0, 255, 0), -1)
        cv2.putText(img, label, (x, y - 2), cv2.FONT_HERSHEY_SIMPLEX,
                    0.5, (0, 0, 0), 1, cv2.LINE_AA)

    cv2.namedWindow("YuNet Face Detection", cv2.WINDOW_NORMAL)
    cv2.imshow("YuNet Face Detection", img)
    cv2.waitKey(0)
    cv2.destroyAllWindows()

# -------------------- Face Recognition -------------------
def recognize_faces(img_path: str,
                    face_dir: str = "./face",
                    model_path: str = "./model/face_detection_yunet_2023mar.onnx",
                    rec_model: str = "./model/face_recognition_sface_2021dec.onnx") -> None:
    """
    1. 读取 img_path 并检测人脸
    2. 对 face_dir 下的每张注册照提取特征
    3. 将目标人脸与注册照逐一比对,取最高余弦相似度
    4. 弹窗画出框+姓名(或 Unknown)
    """
    img = cv2.imread(img_path)
    if img is None:
        raise FileNotFoundError(img_path)
    h, w = img.shape[:2]

    # 检测器
    detector = cv2.FaceDetectorYN_create(
        model=model_path, config="", input_size=(w, h),
        score_threshold=0.8, nms_threshold=0.4, top_k=5000)
    detector.setInputSize((w, h))
    faces = detector.detect(img)[1]
    if faces is None:
        print("未检测到人脸")
        return

    # 识别器
    recognizer = cv2.FaceRecognizerSF_create(rec_model, "")

    # 注册照特征库
    regist = {}  # name -> feature
    for fp in Path(face_dir).glob("*.*"):
        name = fp.stem
        reg_img = cv2.imread(str(fp))
        if reg_img is None:
            continue
        rh, rw = reg_img.shape[:2]
        detector.setInputSize((rw, rh))
        reg_faces = detector.detect(reg_img)[1]
        if reg_faces is not None:
            # 只取第一张脸
            aligned = recognizer.alignCrop(reg_img, reg_faces[0])
            feat = recognizer.feature(aligned)
            regist[name] = feat
    detector.setInputSize((w, h))

    if not regist:
        print("注册库为空")
        return

    # 逐一比对
    for face in faces:
        aligned = recognizer.alignCrop(img, face)
        feat = recognizer.feature(aligned)
        best_score, best_name = -1, "Unknown"
        for name, reg_feat in regist.items():
            score = recognizer.match(feat, reg_feat, cv2.FaceRecognizerSF_FR_COSINE)
            if score > best_score:
                best_score, best_name = score, name
        # 画框+名字
        x, y, w_box, h_box = map(int, face[:4])

        SIM_TH = 0.3                         # 可调,OpenCV 推荐 0.3~0.4
        if best_score < SIM_TH:
            best_name = "Unknown"

        print(f"[{best_name}]  score={best_score:.3f}  box=({x},{y},{w_box},{h_box})")
        color = (0, 255, 0) if best_name != "Unknown" else (0, 0, 255)
        cv2.rectangle(img, (x, y), (x + w_box, y + h_box), color, 2)
        cv2.putText(img, f"{best_name}:{best_score:.2f}",
                    (x, y - 5), cv2.FONT_HERSHEY_SIMPLEX, 0.6, color, 2)

    cv2.namedWindow("Face Recognition", cv2.WINDOW_NORMAL)
    cv2.imshow("Face Recognition", img)
    cv2.waitKey(0)
    cv2.destroyAllWindows()

# ---------- 命令行入口 ----------
if __name__ == "__main__":
    parser = argparse.ArgumentParser()
    parser.add_argument("-i", "--image", required=True, help="目标图片路径")
    parser.add_argument("-m", "--mode", choices=["detect", "recognize"],
                        default="recognize", help="detect:仅检测;recognize:识别")
    args = parser.parse_args()

    if args.mode == "detect":
        detect_faces_yunet(args.image)
    else:
        recognize_faces(args.image)
保存代码。
效果
终端执行指令 python3 fr_onnx.py -i ./img/friends.jpg 运行程序;
打印输出识别结果,包括名称、置信度、坐标等信息;


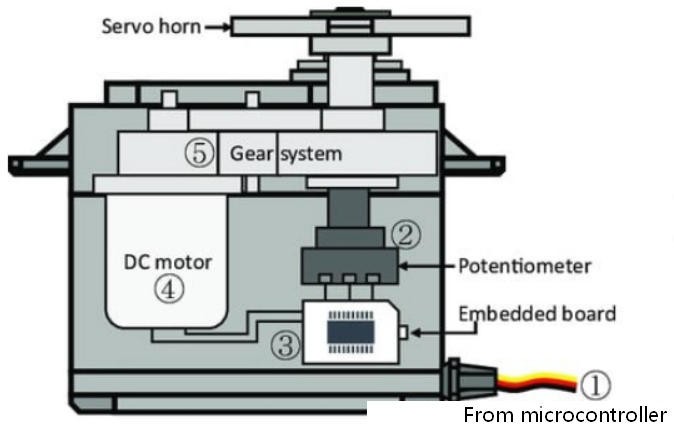
舵机控制
使用树莓派板载 40pin 引脚接口的 PWM 功能,实现 SG90 舵机驱动,并控制旋转速度和角度。
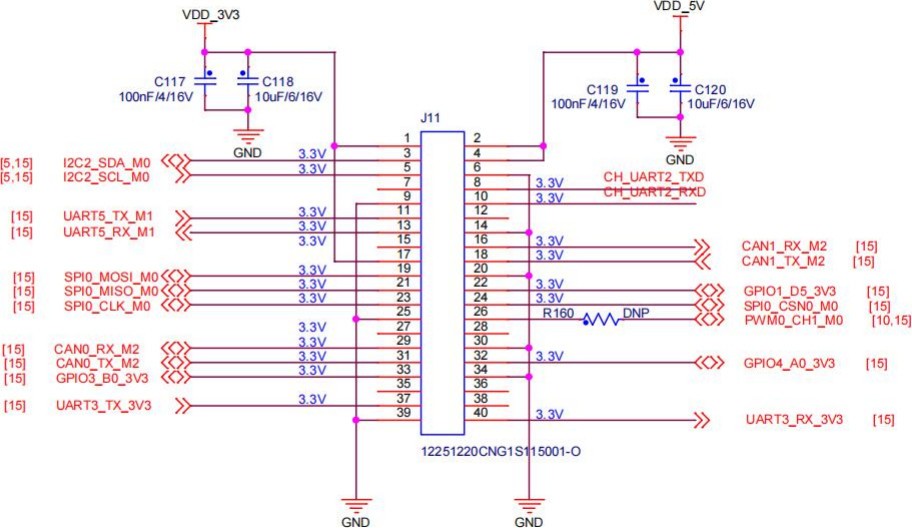
根据原理图可知,板载 40pin 排针 26 号引脚具有 PWM 输出功能。
代码
终端执行指令 touch servo360.py 新建程序文件并添加如下代码
import sys, time
import RPi.GPIO as GPIO

GPIO_PIN  = 18
FREQ      = 50
CENTER    = 7.5
RANGE     = 2.5

# --------- Parameters ---------
SPEED_DPS = 480              # 实测:每秒 480 度
PWM_DEAD  = 0.05             # 停转
# ----------------------------

def duty(speed):
    return CENTER + max(-1, min(1, speed)) * RANGE

def rotate(target_deg, speed=1.0):
    """
    target_deg : 角度,负值反转
    speed      : 0~1,默认全速
    """
    if not target_deg:
        return
    direction = 1 if target_deg > 0 else -1
    run_speed = speed * direction
    run_time  = abs(target_deg) / (SPEED_DPS * speed)   # 时长

    pwm = GPIO.PWM(GPIO_PIN, FREQ)
    pwm.start(0)
    pwm.ChangeDutyCycle(duty(run_speed))
    time.sleep(run_time)
    pwm.ChangeDutyCycle(CENTER)   # 停
    time.sleep(PWM_DEAD)
    pwm.stop()

if __name__ == '__main__':
    if len(sys.argv) < 2:
        print("缺少角度"); sys.exit(1)
    deg = float(sys.argv[1])

    GPIO.setmode(GPIO.BCM)
    GPIO.setup(GPIO_PIN, GPIO.OUT)
    try:
        rotate(deg)
    finally:
        GPIO.cleanup()
保存代码。
效果
终端执行指令 python servo360.py 90 舵机逆时针转动 90 度。
门禁系统
在人脸识别和舵机控制的基础上,实现门禁系统的项目设计,包括文件目录、流程图、代码、效果演示等。
文件目录
~/AI/FaceRecognition $ tree
.
├── access.names
├── app.py
├── face
│   ├── Arnold.jpg
│   ├── Clarke.jpg
│   ├── Perry.jpg
│   └── Robert.jpg
├── model
│   ├── face_detection_yunet_2023mar.onnx
│   ├── face_recognition_sface_2021dec.onnx
│   └── face_registry.pkl
├── static
│   └── result.jpg
└── templates
    └── index.html
流程图
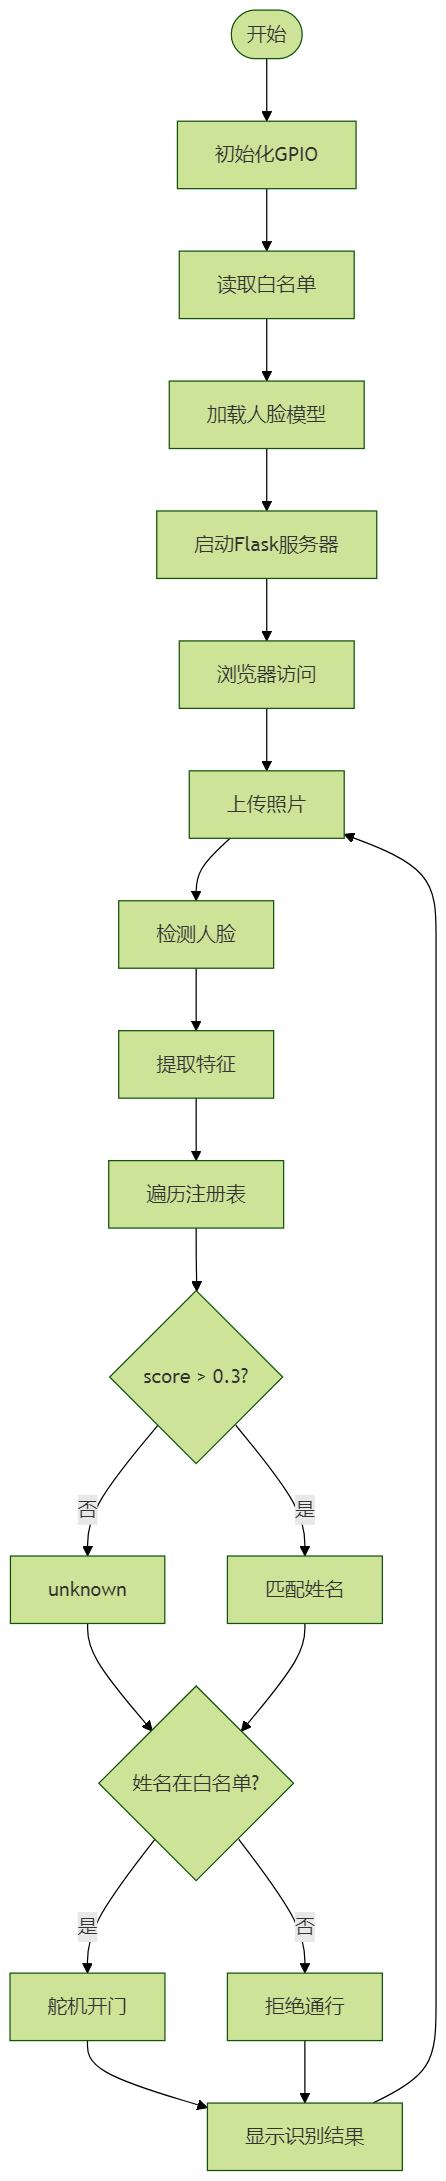
代码
包含三个代码文件,./access.names 为白名单,./app.py 为 flask 服务器后端,``./templates/index.html` 为网页前端。
Flask 后端
终端执行 touch app.py 新建网页服务器后端程序文件,并添加如下代码
#!/usr/bin/env python3
import os, cv2, numpy as np, pickle, time
from pathlib import Path
from flask import Flask, request, jsonify, render_template, url_for
import RPi.GPIO as GPIO
import threading
PIN_SERVO = 18
FREQ = 50
GPIO.setmode(GPIO.BCM)
GPIO.setup(PIN_SERVO, GPIO.OUT)
pwm = GPIO.PWM(PIN_SERVO, FREQ)
pwm.start(0)
# 读取白名单
ACCESS_LIST = set(line.strip() for line in open('access.names') if line.strip())
# ---------- 人脸模型 ----------
detector = cv2.FaceDetectorYN_create("model/face_detection_yunet_2023mar.onnx", "", (320, 320))
recognizer = cv2.FaceRecognizerSF_create("model/face_recognition_sface_2021dec.onnx", "")
registry = pickle.loads(Path("model/face_registry.pkl").read_bytes()) if Path("model/face_registry.pkl").exists() else {}
def rotate(angle, speed=480):
duty = 2.5 if angle > 0 else 12.5
pwm.ChangeDutyCycle(duty)
time.sleep(abs(angle) / speed)
pwm.ChangeDutyCycle(0)
def door_cycle():
rotate(90); time.sleep(3); rotate(-90) # 门禁控制
# ---------- Flask ----------
app = Flask(__name__)
@app.route('/')
def index():
return render_template('index.html')
@app.route('/upload', methods=['POST'])
def upload():
file = request.files['image']
img = cv2.imdecode(np.frombuffer(file.read(), np.uint8), cv2.IMREAD_COLOR)
h, w = img.shape[:2]
detector.setInputSize((w, h))
faces = detector.detect(img)[1]
name, score = "Unknown", 0.0
if faces is not None:
face = faces[0]
aligned = recognizer.alignCrop(img, face)
feat = recognizer.feature(aligned)
for reg_name, reg_feat in registry.items():
s = recognizer.match(feat, reg_feat, cv2.FaceRecognizerSF_FR_COSINE)
if s > score:
score, name = s, reg_name
if score < 0.3: # 识别阈值
name = "Unknown"
# 门禁动作
if name != "Unknown" and name in ACCESS_LIST:
threading.Thread(target=door_cycle, daemon=True).start()
tip = f"{name} 请通行"
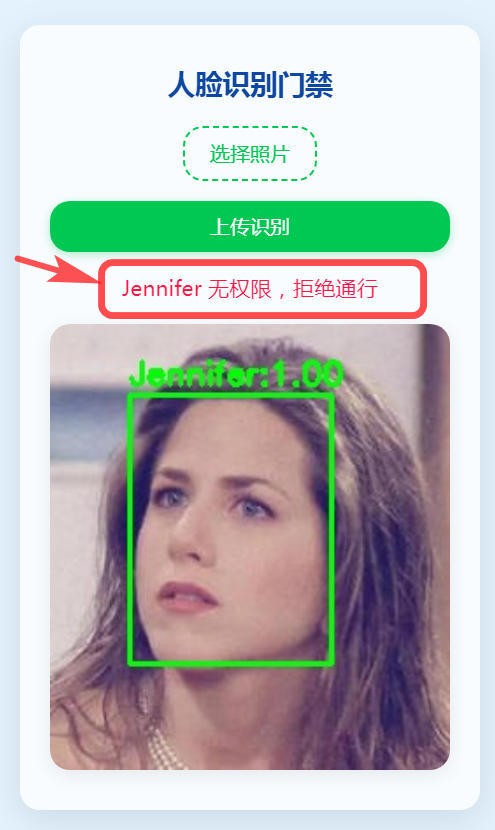
else:
tip = f"{name} 无权限,拒绝通行"
# 保存识别结果
if faces is not None:
x, y, w_box, h_box = map(int, face[:4])
cv2.rectangle(img, (x, y), (x + w_box, y + h_box), (0, 255, 0), 2)
cv2.putText(img, f"{name}:{score:.2f}", (x, y - 6),
cv2.FONT_HERSHEY_SIMPLEX, 0.6, (0, 255, 0), 2)
out_path = "./static/result.jpg"
cv2.imwrite(out_path, img)
return jsonify(name=name, score=round(score, 3), tip=tip,
result_url=url_for('static', filename='result.jpg'))
# ---------- 退出 ----------
import atexit
atexit.register(lambda: (pwm.stop(), GPIO.cleanup()))
if __name__ == '__main__':
app.run(host='0.0.0.0', port=5000, debug=False)
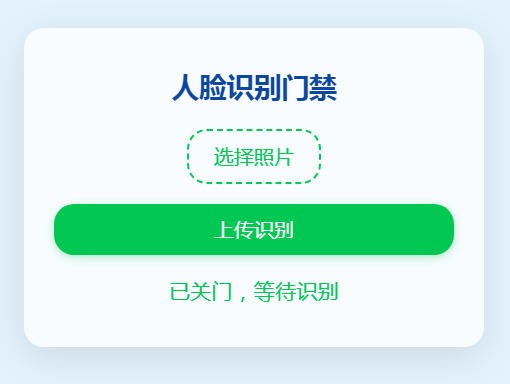
Web 前端
终端执行 touch ./templates/index.html 新建 HTML 前端网页程序,并添加如下代码
<!doctype html>
<html lang="zh">
<head>
  <meta charset="utf-8">
  <title>门禁</title>
  <style>
    body{font-family:Arial;background:#f2f2f2;margin:0;padding:30px;text-align:center}
    #box{background:#fff;max-width:400px;margin:auto;padding:30px;border-radius:8px;box-shadow:0 0 10px rgba(0,0,0,.1)}
    img{max-width:100%;margin-top:15px}
    .status{margin-top:10px;font-size:18px}
    .opened{color:green}
    .denied{color:red}
  </style>
</head>
<body>
  <div id="box">
    <h2>人脸识别门禁</h2>
    <input type="file" id="fileInput" accept="image/*"><br>
    <button onclick="upload()">上传识别</button>
    <div id="status" class="status"></div>
    <img id="resultImg" style="display:none;">
  </div>

<script>
async function upload(){
  const file = document.getElementById('fileInput').files[0];
  if (!file) return alert('请选择图片');
  document.getElementById('status').innerText = '识别中...';

  const form = new FormData();
  form.append('image', file);
  const res = await fetch('/upload', {method:'POST', body:form}).then(r=>r.json());

  document.getElementById('status').innerHTML = res.tip;
  const img = document.getElementById('resultImg');
  img.src = res.result_url + '?t=' + Date.now();
  img.style.display = 'block';

  // 3 秒后回到等待状态(舵机关门完成)
  setTimeout(() => {
     document.getElementById('status').innerText = '已关门,等待识别';
     img.style.display = 'none';
  }, 3000);
}
</script>
</body>
</html>
白名单
终端执行 touch access.names 新建白名单文件,并添加人名列表
Linda
Edward
Clarke
保存代码。
效果
终端执行指令 python app_DC.py 运行程序;
终端打印 Web 服务器网址,如http://192.168.31.117:5000/ ;
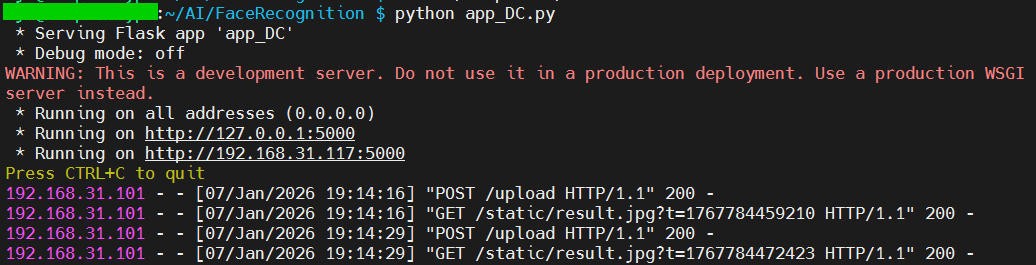
浏览器打开服务器前端网页;
- 点击
选择文件 按钮,加载目标识别人脸;
- 点击
上传识别 按钮,立即显示识别结果、是否允许通行;
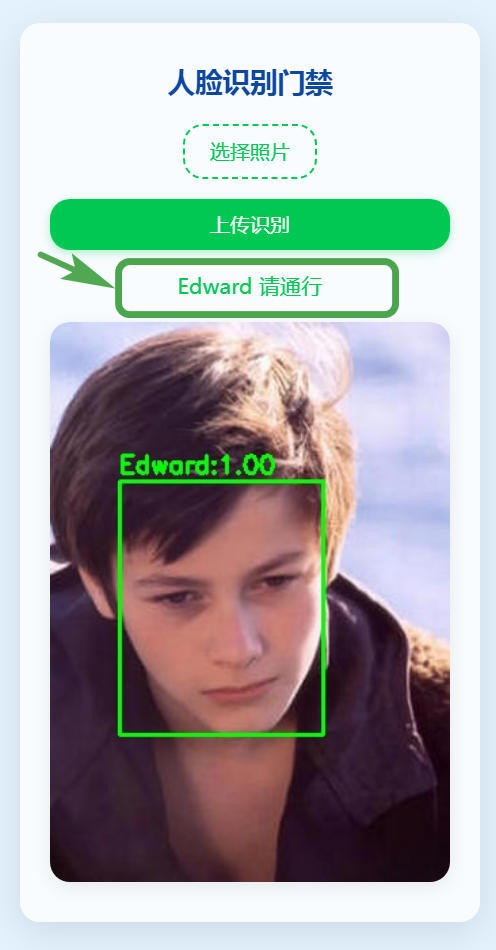
- 同时舵机逆时针转动,控制门禁档杆移动,表示允许通过;
- 待三秒钟后,舵机顺时针旋转 90 度,表示门禁关闭;
- 网页前端显示门禁已关闭,回到
等待识别 状态。
动态效果

总结
本文介绍了米尔 MYC-LR3576 开发板结合 OpenCV 人脸识别和 PWM 舵机控制实现智能门禁系统的项目设计,包括硬件连接、舵机控制、人脸识别、网页前端设计、网页服务器设计、流程图、代码和效果演示等流程,为相关产品在边缘 AI 领域的快速开发和应用设计提供了参考。
项目源码详见:lijinlei/EdgeAI | GitHub .


 网站备案号:ICP备16046599号-1